Optical Illusion Handmade Card Ideas With Astrobrights

Optical Illusion Handmade Card Ideas With Astrobrights

optical illusion handmade cards

I'm excited to share with you these optical illusion handmade card idea using Astrobrights cardstock. I came up with these neon and black cards on the fly and thought they were so fun, I just had to share this easy handmade card tutorial so you can make your own.

My newsletter subscribers get a new handmade card sketch each month and this month I'm actually sharing the sketch here (which I don't usually do) so that you can replicate these neon cards if you'd like. The card sketch features a 12 grid dot pattern cut file.

Download sketch files here

Neon Handmade Card With Astrobrights

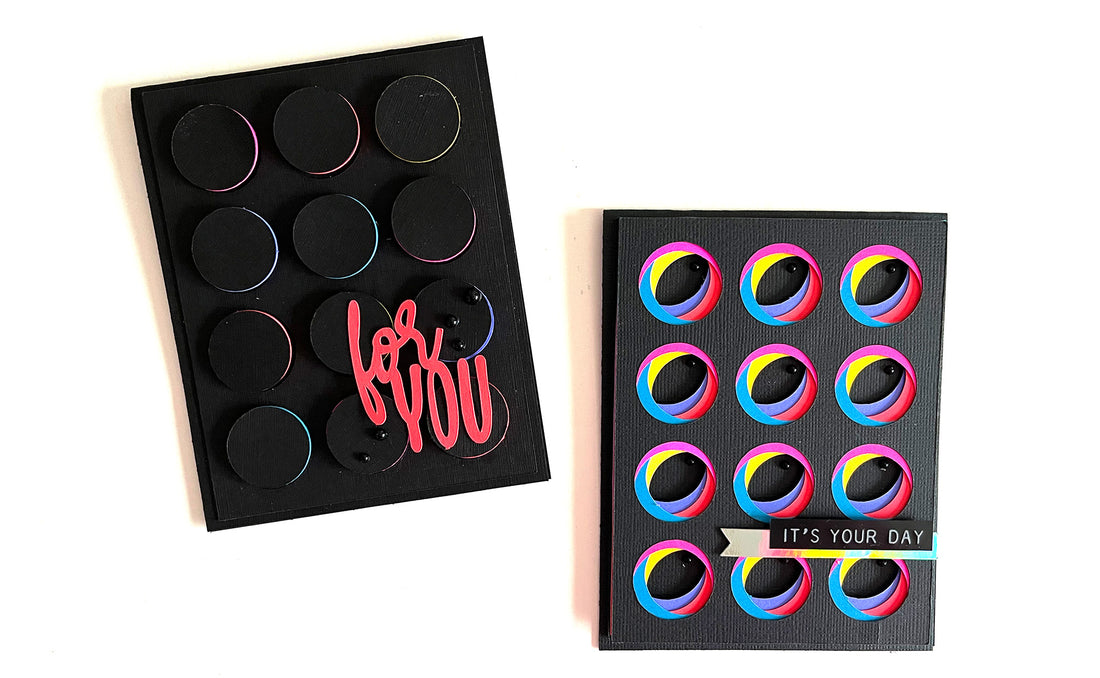
Layered Dot Eclipse Card

Card number one is an eclipse card. Cut the same card background 5 times in 5 different neon colors of cardstock, and then once in black.

black and neon handmade card

Sort the circles by color, then grab 5 of the same color and glue them together stacked up. You'll be left with the negatives of the cut out circles, set those aside for now.

stacked circles for neon handmade card

Glue a black circle on each of the stacks of 5. This creates faux chipboard circles with some dimension. Finish this process until you run out of circles. You'll need 12 stacked circles. 

eclipse card tutorial

 Next, adhere the black card sized negative piece to another piece of black cardstock. Place a dimensional foam square in the middle of each black hole and then begin placing your colored circle stacks in the black holes, changing up the colors in a pattern as you go. 

how to make an eclipse card

Once you get to this point you can add any sentiment you'd like to the front of the card. I added a simple sentiment with holographic paper to contrast with the black and neon. 

handmade card idea

Kaleidoscope Black and Neon Card


kaleidoscope card
This next card was kind of a happy accident. I noticed all the scraps left over from the card above and decided to make another card. 
using astrobrights cardstock on a handmade card
To get started, cut another black cover piece (the one with the holes). 
The key to this card is to line up the colored pieces so they peek out a bit from the inside of the back holes. To do this, you stack a color behind the black and then shift it slightly so it peeks out. One color will be shifted to the left, one to the right, one up and one down so you get a cool kaleidoscope effect in each window with four colors showing through. Place glue in between each layer as you go (though I would recommend doing a dry run first before glueing to make sure that you like your color placement). 
Here's how this looks layer by layer...
kaleidoscope card tutorial 1
Because we are using leftover scraps to make this card, when you shift the colored layers they will peek out from the sides as well. Just trim them off using the edge of the black as a guide. You can do this after each layer, or at the end. 
kaleidoscope card tutorial 3
Once you've got all those layers on there, give the edges one final trim so you don't see any color peeking out from the edges.
kaleidescope card tutorial 5
Use foam tape to mount the whole piece onto a black folded card. I also finished off my card by adding some tiny black pearls (found here) inside each of the circles and added a stamped sentiment. 
kaleidoscope optical illusion handmade card
I love how these turned out. The neon colors of Astrobrights really pop off the black and both cards have an optical illusion effect.
Back to blog